EMAIL THE
ELEVATOR!
WHAT?!
It all started with a simple idea: call the elevator by email.
Today, email is much more of a corporate tool and no one else uses it as they did before.
Remember when we shared videos, pictures and links by email? Not anymore.
Facebook messages and timeline, sms, Whatsapp and others, are what is trending now
to share our lives with our online peers.
After a quick search and many laughs, we decided to put the idea to work. To use email to call the elevator seemed to give a new function to something increasingly without functionality. Even that the whole idea was not very practical, we had to make it. But, we barely knew how.
By the way, this is a text full of technical jargons and most of them are baby talk to Sheldon. If they do not make any sense to you, skip it and stick with the video.
Our elevator is one of those from 50 years ago. For being so old (for our own good or not),
we had access to all the guts of it, from the machine room to each floor button panels,
as they are locked with only two screws. Once we started thinking about it, I realized that any
other elevator, slightly newer would make it harder to access the buttons, they have a digital control
unit and ongoing maintenance. Everything we did not want. If we had to hack the central unit,
we could cause it to malfunction, it was then out of the question.
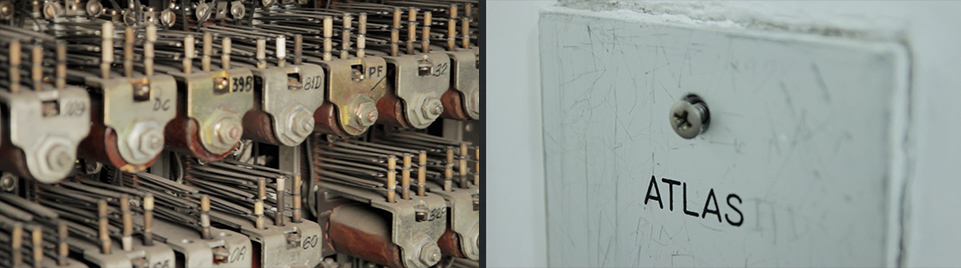
Ours was perfect for a hack! And safe. All we had to do was to press the button
of the floor's panel. We just needed some wireless device that accomplishes this huge and
complicated movement that humans took centuries to develop. We didn't knew for sure
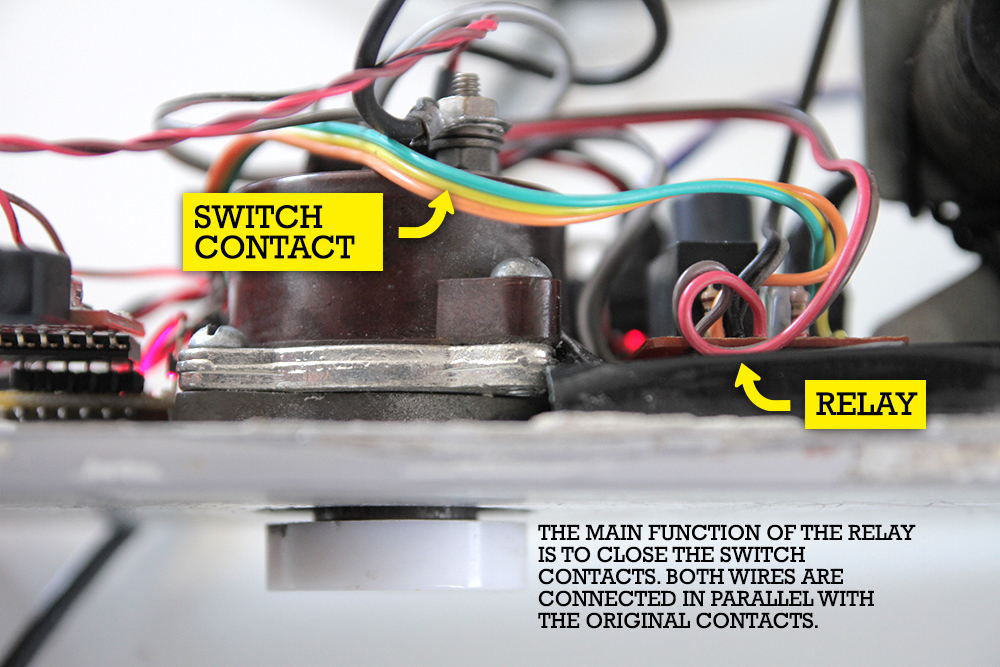
the voltage and the amperage of it, so we couldn't add a new circuit to the panel.
The simplest way was to use a relay to close the button contacts (remember that
it does not change the original parts).
Apart from the problem of triggering the elevator, we would also have to know if the elevator
had already reached the floor. What's the point of calling the elevator by email and not knowing
whether or not it arrived? It couldn't be just a receiver device to activate the relay, but
it also had to send out data. It had to check a sensor.
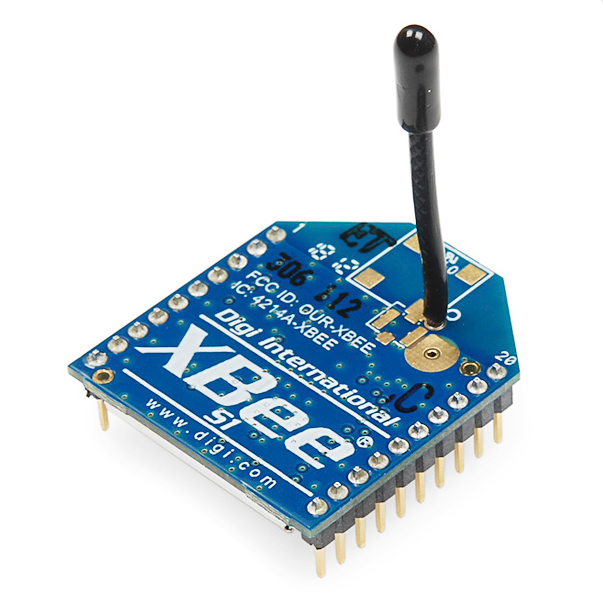
We're glad we had a couple of
Xbees
lying around for emergencies, and right in the first test, the signal
decayed very fast after 5 meters. As the signal was very weak, the elevator metal panel itself
act as a very good insulator and diminished the signal.
The signal level was very unstable. Since we decided to make it, it had to be done right
and the signal had to be stable. We could use
stronger Xbees
but buying and waiting for the new components would kill us with our anxiety
to see it working.
For this anti-anxiety moments, we had one more trick up our sleeve, and now we had total control:
YellowJacket.
It is the name of a
small bee,
but also an Arduino + wifi module in the smallest form factor available.
Much smaller than a shield or an Arduino Pro Mini + wifi standalone module.
I knew it would be useful someday.
And it was already there, somewhere over the bench.
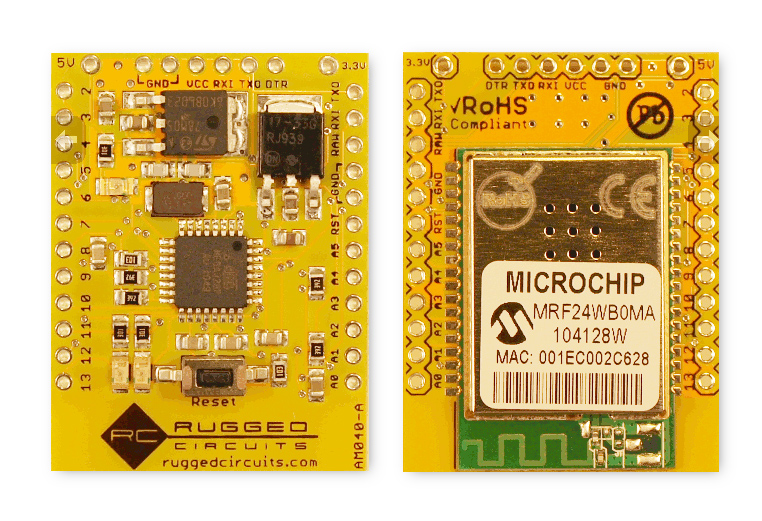
To use and set it up is very simple, just put the IP, the name of the wifi network,
the security protocol and the password. When it enters the network it can act as a client (sending
data to server), as a server (receiving and sending data to client) or as
socket,
basically doing whatever you want.
The easiest and fastest in this case is to use the Yellowjacket in server mode, since the client mode only transmits data and the socket mode
uses a very low-level programming and needed a
protocol,
thing that made us very lazy just to think about.
Before going into the details of the hardware and software, see an outline of our plan:
Before going into the details of the hardware and software, see an outline of our plan:

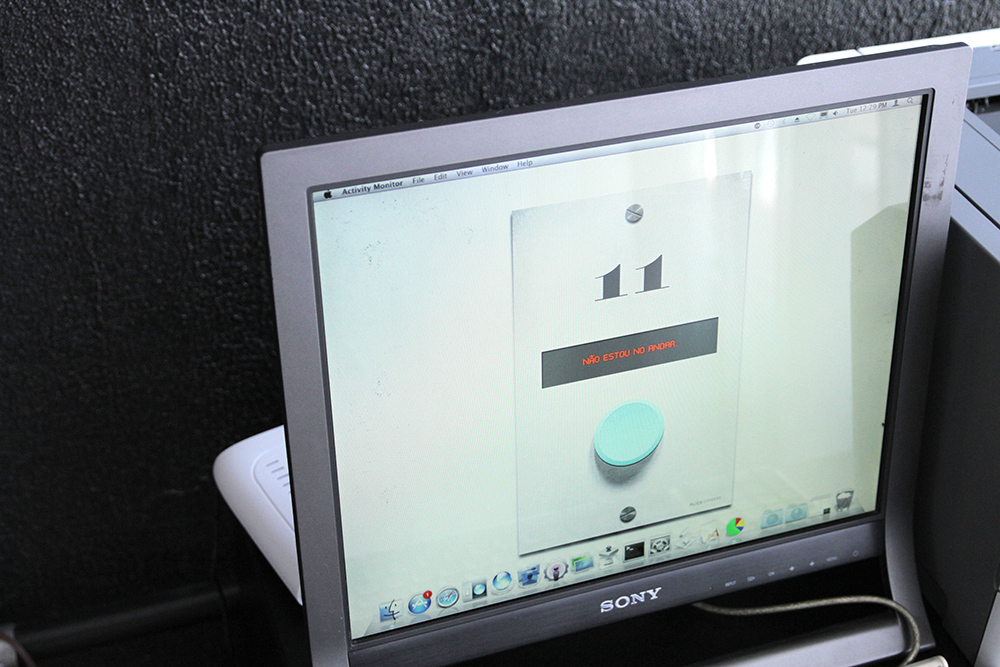
Everything starts in the email. When someone sends an email with the subject "venha" (come) to elevador@alicewonders.ws
this email "waits" on the server.
A Flash application, running on any machine, keeps looping checking the inbox. As soon as
it detects an email with the correct subject, the application access the ip of the Yellowjacket,
inside the elevator button panel with the instruction "come". The Arduino then activates
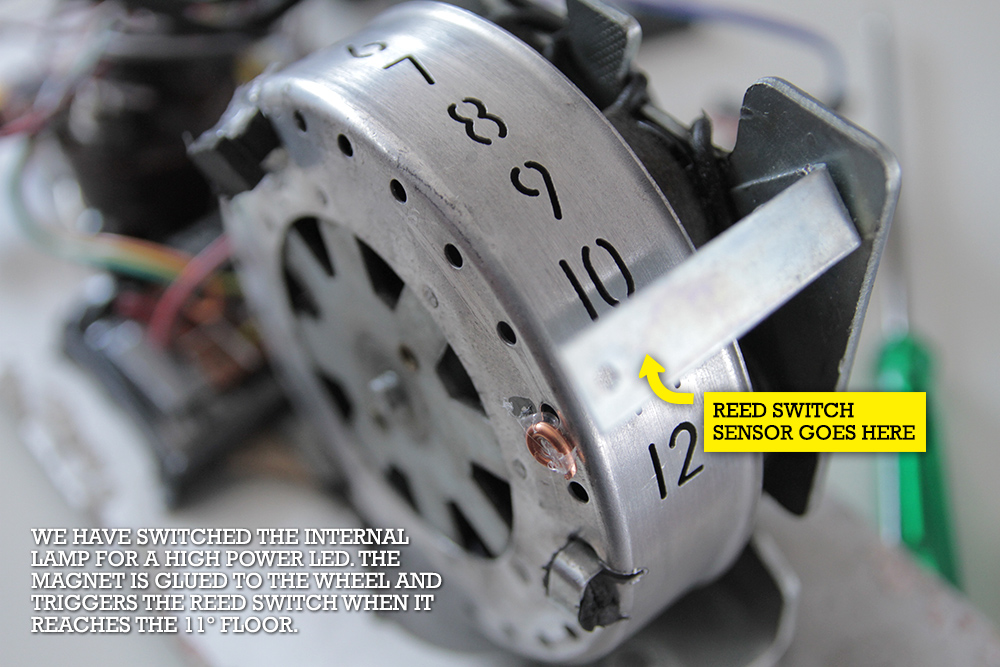
the relay, and the elevator comes! The same program in Flash now checks in loop if the
elevator arrived. When the elevator arrives, a
reed switch
(magnetic mechanic sensor) that is triggered by a
magnet on
the wheel of floor numbers, changes the variable elevadorChegou to 1.
When this happens, the Flash app sends an email with the subject: I arrived,
in response to everyone who sent an email.
During the first tests, the first issue that appeared was with the library WiServer
that is used by Yellowjacket and other wifi shields to operate. When you download
it from the
AsyncLabs
website, it works in synchronous mode, in other words, things operate linearly.
In this mode, the module first connects and authenticates to the network,
then the Arduino and other things start to work.
If the network connection goes down, or the signal weakens, everything stops on the Arduino module
so that it tries to connect again. The Arduino gets frozen and can't do anything else to
make the module reestablish the connection again. Unfortunately, in our tests,
after the connection drops, it never returns.
I think it's a limitation of the module or the library. Searching on Google, obviously,
others had the same problem.
Picture the problem: you install a microprocessor inside the elevator panel, and as the wifi network fluctuates, the module loses connection with the world and hangs. To put it in the net again, we had to dismount (usually after 8pm so the elavator does not stop working on the floor) and hit the reset button on the Arduino.
It couldn't be like that, it had to run infinitely and perfectly. So, we did as following:
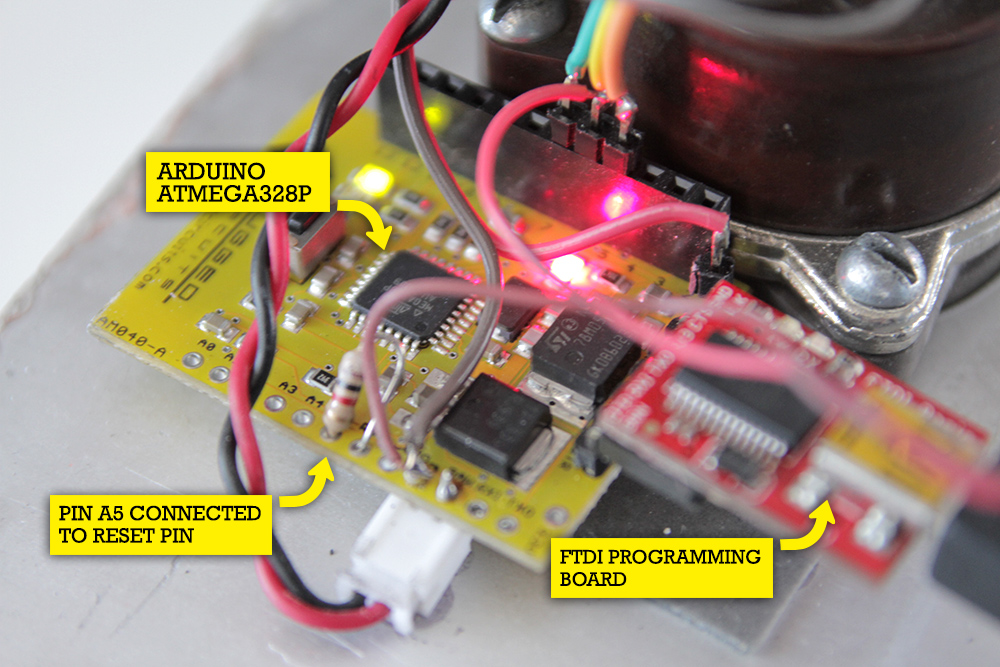
With the help of this guy HRUSKA, we adapted the library to operate asynchronously, so things can work in parallel. If the connection drops, the Arduino waits for the module to reconnect for 90 seconds and if it can't reconnect, it resets the whole thing. This way, we make sure that the connection would come back. You can see on the image that pin 6 is connected to the reset pin of the Arduino. When we want a hard reset on the module and the Arduino, just put the pin 6 to HIGH and voilá.
So, if you have no connection, the module keeps resetting itself for about 90 seconds until it finds one. We use the Analog pin 5 (A5) connected with a pull-up resistor to the Reset pin. See the picture:
Picture the problem: you install a microprocessor inside the elevator panel, and as the wifi network fluctuates, the module loses connection with the world and hangs. To put it in the net again, we had to dismount (usually after 8pm so the elavator does not stop working on the floor) and hit the reset button on the Arduino.
It couldn't be like that, it had to run infinitely and perfectly. So, we did as following:
With the help of this guy HRUSKA, we adapted the library to operate asynchronously, so things can work in parallel. If the connection drops, the Arduino waits for the module to reconnect for 90 seconds and if it can't reconnect, it resets the whole thing. This way, we make sure that the connection would come back. You can see on the image that pin 6 is connected to the reset pin of the Arduino. When we want a hard reset on the module and the Arduino, just put the pin 6 to HIGH and voilá.
So, if you have no connection, the module keeps resetting itself for about 90 seconds until it finds one. We use the Analog pin 5 (A5) connected with a pull-up resistor to the Reset pin. See the picture:
Note: to connect, authenticate and register the IP, the module takes between 45 and 60 seconds.
If you use this library for other projects or other hardware, download the updated version here. This asynchronous library gives much more control to any application.
Another detail: every 90 seconds, the module makes a request to google.com, so the module and our internal network keeps everything running so that it won't "sleep" in service. It seems that if it does nothing, the module enters on standby mode and the network will no longer recognize that IP.
After these adjustments, we had no more problems and the connection was rock-solid!
See the full Arduino code:
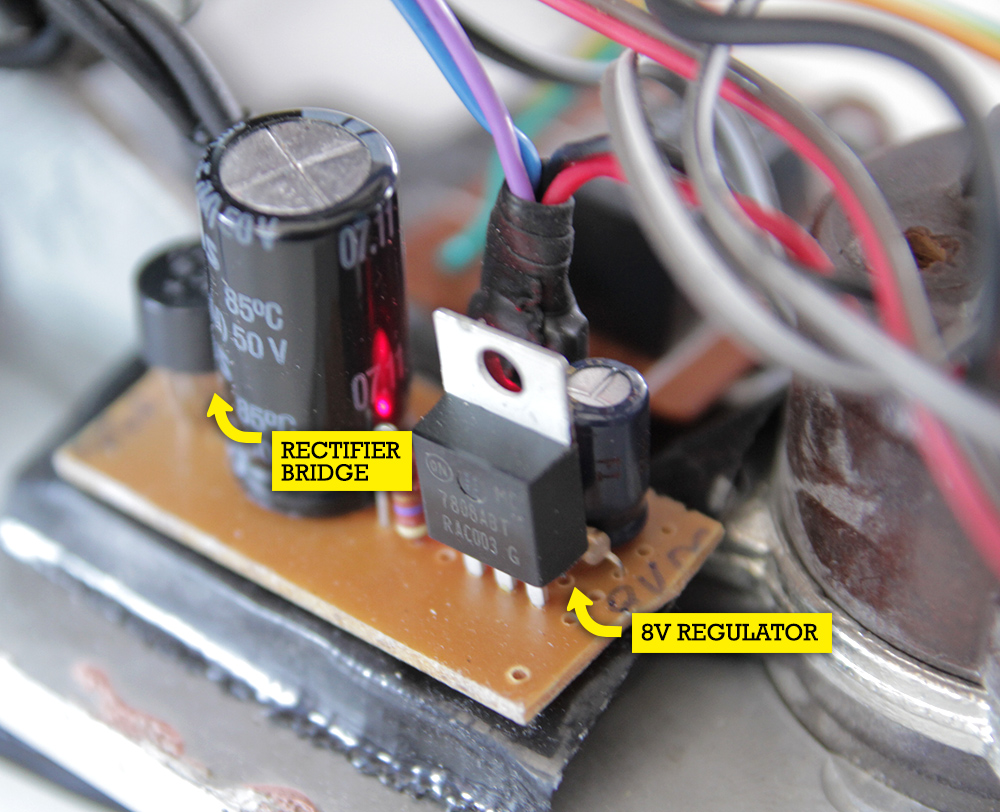
About the power: Since we could not use batteries (they do not fit in the tight space, and
obviously, they get drained) we made our own mini-regulated source, generating a DC voltage
of 8v (Since the Arduino works with minimum 7v so it can regulate to 5v), right from the 12v
AC voltage inside the panel.
The Arduino code was ready and everything worked perfectly, now it was time for Flash!
(We love Flash so we decided to resurrect it! Flash only died for the web!
It's still incredibly easy and flexible for a million other applications outside the web. Beyond making a neat interface, we didn't want to get us locked to just the Terminal or Python scripts!) The plan for Flash was something else: use a library to connect to your email server, download messages, send instructions to the module on the elevator panel, wait for the module to return information, if the elevator arrived, and finally send the response email.
It's still incredibly easy and flexible for a million other applications outside the web. Beyond making a neat interface, we didn't want to get us locked to just the Terminal or Python scripts!) The plan for Flash was something else: use a library to connect to your email server, download messages, send instructions to the module on the elevator panel, wait for the module to return information, if the elevator arrived, and finally send the response email.
The code is pretty self explanatory and we didn't have problems running it.
The Arduino communicates with Flash sending variables via a simple web request.
When Flash accesses the module address (ie. http://192.168.0.150) the Arduino
returns a simple HTML with variables in the format:
variable1=1&variable2=0.
We can also control the module calling other URLs such as 192.168.0.150/reset
or 192.168.0.150/chama.
If more than one person call the elevator at the same time (or after someone has called but the elevator has not yet arrived), the application stores the list of emails and responds to everyone, so nobody goes unanswered!
See the code in Flash:
If more than one person call the elevator at the same time (or after someone has called but the elevator has not yet arrived), the application stores the list of emails and responds to everyone, so nobody goes unanswered!
See the code in Flash:
That's it. I'll add more details and suggestions as they arrive.
We have upcoming ideas to generate a widget and/or an app (with notifications for Mountain Lion)
to also call the elevator.
Want to share some ideas?
www.facebook.com/eric.winck or eric@alicewonders.ws
Thanks everybody that made this happen! Especially: Ale for the illustrations, Carlos for the Flash development, Powerball for the hardware and electronics and Gustavo for the user interface!
Want to share some ideas?
www.facebook.com/eric.winck or eric@alicewonders.ws
Thanks everybody that made this happen! Especially: Ale for the illustrations, Carlos for the Flash development, Powerball for the hardware and electronics and Gustavo for the user interface!